Looks easy right??? Not too easy, but still do-able. I searched all over the Internet to try and find some EXACTS on how to do these things. NO LUCK. So, i figure i would document my experience along the way and see how it all turned out.
It took quite a long time to do. But all together, this could be done in one day if you have talent... (Took me about 2 weeks!)
SO, lets begin!
We start out with a random find on some website named PINTEREST. I'm sure you've probably never heard about it. We came up with several different things on there, but i was never able to find something that applied to what we needed to do. Mostly because: This is our space we were dealing with. We have a bar with 4 seats and no lights above it. 2 kitchen lights and 1 light in the sitting area, but nothing above the bar. Kind of drab...
So, my beautiful wife found some Blue Mason Jars at an auction she went to, but only found 2 there. So we went out on a search for 2 more. We bought 3 (1 extra for good measure) at a cost of $3 each. So far a total cost of $9 into this project...
So there's the start. What's next you ask? Well, i initially started to piece this all together from individual parts: Clear wire, fixtures, and all that stuff. I finally just decided to get a pendant kit. Got 4 off of AMAZON. Total cost on those was $68.50, shipping and all. You can find them or something like them at you local Home Depot or Lowe's.
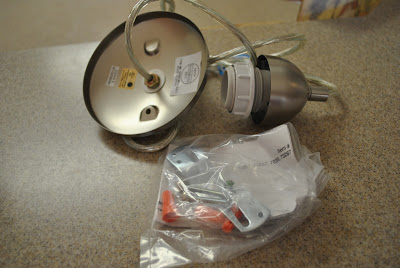
Out of the box, they will look like this. And then, the fun stuff, you start tearing stuff apart!!!
Take the top piece off that attaches to the ceiling. There is a small plastic set screw in the top to hold the wire in place. Take that out, or at least loosen it up.
The pendant part will have to be disassembled too. This also has a set screw too. I was able to take them all off by hand although some of them were really tight. This part will be used to go through the lid of the mason jar.
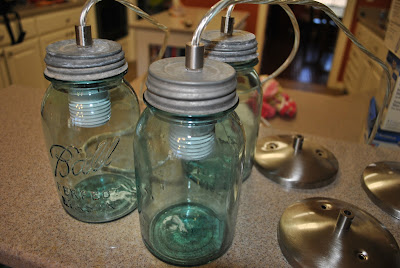
So, after much disassembly. Here's what you've got. (There's only 3 in the picture, I actually ordered 4, 1 came in a few days late)
Next to the lids. Each lid has a ceramic type coating on the inside. There's really no way to get around not breaking them. I used a center punch to bust through the very center of the lid. This will crack the ceramic and at least bust through the lid a little bit. Then you can screw through the rest of the lid.
The holes that are drilled need to be big enough to get the wire through, but not too big as to not get the fixture assembly to fit on the top of the lid good. I used about a 7/16" bit. Some of the wholes were a little bit bigger, but it all worked out.
NEXT, a good wash of the Mason Jars and lids for one last time. Get em good and squeaky clean before they become light instead of sweet tea holders!
Next, take the wire and thread it through the lid, then slide the small lock washer and cap with the set screw down onto the top of the lid. Put the set screw back in and tighten it back down. This will make sure that the fixture will insert straight down into the jar. All these steps were the easy parts so far. That's all for the lid assembly. No messy messes with wires... yet.
Then you can put these lids on the Jars and that part is pretty much done. Except for light bulbs of course. We used small incandescent bulbs, 40 Watt. A normal size incandescent bulb will not fit in the opening of the jar. The new 'curly q' fluorescent bulbs, full size, will fit in the jar, but just barely. The new switch that we are going to install will be a dimmer switch and this looks pretty good with the incandescent bulbs and doesn't work with the fluorescent unless you get a special type of bulb.
Then, the top piece that will go on the ceiling needs to be put on the cord. Along with the metal mounting plate. To look like this below.
The part that you can't really mess up on next. Drilling some holes in the ceiling... Basically, figure out exactly where you want them to go, you can use a plumb bob if needed. These can also be installed in a can light fixture if you already have those installed where you are wanting these lights to go. So I figured out where exactly I wanted these to be mounted and drilled a few holes in the ceiling. Then, i put a coat hanger up through the holes so i could figure out where they actually were up in the attic. This made it a little bit easier since i was searching through about 10 inches of insulation.

Every ones situation will be different on how you mount these in to the ceiling. I decided to do the easiest thing in my case and I had the materials also, so save money there. Up in the attic, I spanned 3 of the trusses. These were 24" apart, so the top 2x4 was ~50" long or so, no need to be exact. The trusses were made of 2"x4"'s, so I needed something to get closer to the ceiling with. I had plenty, so I used 2 more 2"x4"'s, just a little bit smaller in length. This got me about 1/2" away from the sheet rock in the ceiling. Then I drilled a hole in them all the way through so that the cord would run up through it. This worked good for me and the impact was really minimal as far as what I had to do to the ceiling. I was afraid of cutting big holes in the ceiling, but i was OK with screwing a few holes through the sheet rock.


Next part will require 2 people for sure, no real way around it. Having someone down below who can thread the cord through the hole is a must. Up in the attic i was able to get the cords secure them to the 2"x4". As far as the length, i didn't get them all exactly the right length just yet, i waited until they were all installed, then adjusted the heights to match each other. They look good all matched, but i bet they would look just fine too with different heights on them all.
The next part was a little bit harder too. I used some ~3" deck screws that i had to secure this mounting plate to the ceiling. The screws go through the sheet rock and hit the 2"x4" that I mounted in the attic.
One tricky part that I had was installing this cover onto the mounting plate. The screws had to be cut to the right length to fit with the little 'ball' looking things on the cover. It really wasn't too tricky after I got the first one cut to the right length. I used the little tool on the pair of wire strippers that I had, this made cutting the screws easy. After this is all assembled, back into the attic you go. Now is the time to make sure that all the lights are at the height that you want them and make sure they are good and secured up there. I used a staple gun around the wire and some good old duct tape too (No project is ever done unless you use duct tape!!!).

That's pretty much it for the installation of the lights. The wiring is another story. Insert Disclaimer here. I am by no means an electrician. An engineer by trade yes, but no way an electrician. Contact an electrician to do this part if you are like me. And always, step #1, make sure that the breaker is open for the circuit you are working on. Luckily, I had a friend who was more that capable of helping with this part. Again, each situation is different especially when it comes to the wiring. Wiring, got 25 feet roll for 17$. That takes us to $85.50 Total so far.
My setup basically had a single switch that operates our garbage disposal. Well, that wasn't going to work, so I had to cut into the sheet rock and make it a double gang box (2 switches). Cutting into the sheet rock scared me a little bit, but just take your time.


And like I said before, the dimmer switch was the way we went. This adds a lot of character to the lights. And its really not harder to install. It was $12. That takes us all the way to a grand total of $97.50 for the whole project. I came out pretty good I guess, since i didn't really know what to expect going in. I'm sure a lot of things could have been done cheaper, but I did the best I could.
So HERE IT IS. I'm happy with the way it turned out overall. It was time consuming, but fun. I learned a lot during the whole process. Here they are dim...
And now bright.. with a little ku ku kachoo in the background (Nemo...)


